Sunday 29 July 2012

Beer Bottle Craft

It look me forever to find anything useful to do with beer bottles, that was not to do with bottle caps. I looked at this website. http://imgfave.com/view/1762109
I liked the idea of using four bottles and then using a letter on each, instead of love just being on the one bottle as my bottles were a bit smaller and I thought it would be a little different than just the one bottle. Most people spray paint the colour onto the bottle and that is a neater way but I painted mine because it was cheaper.


Step 1: Gather four beer bottles, or any bottles of that size, I used lemon, lime and bitters bottles, that I had leftover from just general use.
Step 2: Get the labels off them. I suggest soaking in boiling hot water and then get a scourer and scrub off the glue residue.
Step 3 : Get you glue gun on hot and make sure you have more glue sticks because it can take more than one go to write out the letter. (If you do make a mistake the glue is easy to peel off once dried.
Step 4 : Let the glue to dry completely before painting or spray painting the bottles.
Step 5: Paint or Spray paint the bottles, might take two coats if your bottle is a not clear. Make sure that you check that there is paint in the letters, so for instance the "O" make sure there is paint on the inside so that it is completely covered.
Step 6 : Let it dry and then place in your house or even used for your wedding.


Tuesday 24 July 2012

Pringles Can Paper

So I decided since I had two pringles can to try out what is easier to do, paper or fabric. I found that fabric is better for the pringles can because when you put the lid on the paper can crinkle slightly, I added a strip of ribbon to the bottom just to add more detail and so there wasn't just block colour. I made the same button design. Which is basic kitchen string threaded through the button whole tied around and letting the button hang. I then got my glue gun which I had out at the time and glued the button to the can due to there was writing on the other side of the button and I liked the button facing this way.

Instead of wrapping the paper around the whole lid I just place inside the lid so that the pattern is still showing , so you can't see the inside of the pringles can.

Sunday 22 July 2012

Pringles Can Craft

Well I had a pringles can and thought wow, this is good cardboard or a good container for something. I went googling and found this great idea. The idea was to make it into a spaghetti pasta container. There are Tupperware containers that can do it, but the pringles can is air tight and will do the same thing.
http://jasonandwhitneystowell.blogspot.com.au/search/label/DIY

Instead of using paper, I used left over fabric and then to add a little bit more detail I got ordinary kitchen string and added a button to create a little more homely touch.
Step 1: Is to gather the material you need and attach either with a glue gun or with double sided tape. 
Step: 2 Then cut out a large circle using the lid as a guide, make sure it is about 1-2cm more than the actual lid size.
Step 4:  Bring material in and glue down or use double sided tape.
Step 5: Gather string and loop the buttons into the string and then tie at the back of the pringles can.
Step 6 : Add pasta or any other items you want to put in there.

Saturday 21 July 2012

Photo Box Elephant

I saw this on this website and thought it was too cute for words. I don't have any kids or any on the way but I think it would be perfect in a kids room or even if you just like elephants. I think I will try to make another animal with a different colour but I tried to the elephant first as blue is a colour that my little sister likes and I made it for her.
http://bustedbutton.com/2012/04/27/button-elephant/
Check out that website there are some other really neat ideas if you are a crafting king or queen.
 This is my complete elephant, now the image isn't that good but you can't see the silver sprouting from the elephants trunk. The original elephant have less structure than mine, but I think it still turned out very well.
I picked up the buttons from spotlight for about $9.00 but they were a variety of buttons and there were still heaps left over. I use double sided tape to stick down all the buttons.
The first step is to choose the image you want and erect it to the scale that you need and print it out.
Step 2: Attach the image to a fine cardboard, maybe a cereal box width or just even some hard card just so when you paint over your image that the paper doe not completely fall apart.
Step 3: Paint the image, I choose a grey blue as we had that in the shed and it turned out quite nice. To make a brighter elephant I suggest a brighter colour.
Step 4: Arrange the buttons onto your card after the paint has dried. (I suggest to do this before gluing so that you can see the ratio of big to small buttons and not group too many bigs or smalls together.
Step5: Glue or stick the buttons down (to check what buttons aren't glued down at the end turn upside down and see if any fall off.
Step 6: The frame box, I purchased from bunnings for under ten dollar. There is glass so when painting be very careful, Windex will clean paint off the glass if the paint is acrylic. I painted it white to make it stand out.
Step 7: Paint the cardboard and when dry attach your animal in my case an elephant to the card.
Step 8 : Add details to your elephant, for example I put silver on the bottom and as though water is sprouting out.
Step 9: Place cardboard back into frame and TA DA!!!

Tips: Try to put newspaper in the glass to protect from the paint. Make sure that your cut out is basic and can be easily recognized without the lines.
I suggest getting one from a drawing book for kids.

Thursday 19 July 2012

Recycled Books Flower

This was a simple and cheap little decoration that I really wanted to try. I got the whole thing from this cool website. http://www.sundaybaker.net/2011/02/book-page-flowers-tutorial.html
My flowers were a bit bigger than the ones they made, plus I only made one of them n it was just put on a book not a cool looking vase. All you need for this is an old book, double sided tape and a button or buttons depending on the amount of flowers you wish to make. I found that only using one page didn't give the flower  enough volume. I think that three layers was much better than one, make sure to leave a big enough gap to squeeze in the rolled flower petals.
TA DA!!! I think with more flowers and time it could look really amazing, I was thinking of putting them on a canvas as flower with a black background.

Wednesday 18 July 2012

Book Craft Folding 101

CHEAP!!! This is crazy cheap, I went to an op shop and picked up this old book for 50c and that is it, all you need is a book. :)
http://awhimsywillow.blogspot.com.au/2012/03/book-art-tutorial.html
This was my inspiration as well the guide I used to make this book craft.
It was a long process takes awhile but it looks fabulous. :)
I did use instagram to upload the photo but it looks amazing once it is finished. There are lots more ways to fold the book pages to make different artwork.
TIP: After awhile it takes a toll, so the best thing to do is watch television or a movie or maybe even your kids.

TIP: Stick down the last to pages to the book cover.

Tuesday 17 July 2012

Craft Boxes :)

Well I have started to have beads, buttons and ribbons everywhere so I bought some little craft boxes from crazy clark's for just $3.50.  That is what the boxes looked like at the beginning of the project. Basic cardboard.

STEP 1 : Was to paint the boxes, now you can do just the outside but I decided that I would do all of the cardboard just because I think it looks nicer, but it does take more time to paint the inside and out.

STEP 2 :  Wait for it to dry, and then decide what you want on the inside, this way you can decorate the box top to hold in the box. So I choose buttons, beads and ribbons, so I used those to decorate the tops.

This here is my ribbons box, inside I have the beads to show what would be inside the box. Basically this was the easiest to assemble as all you have to do is make a bow in a piece of ribbon and then either with double sided tape or craft glue stick to the top of the boxes lid.


This is all the rest of the boxes, there was three. The first one at the top is the bead box and that has beads on the top and a twisted ribbon glued down in the middle. The beads might need to be attached with a glue gun if the beads are round, the beads I used were flat so I attached them with just craft glue. The bead box was a little bit more difficult as I had to use some jewellery wire to attach the buttons on top of each other. The easiest way is to just to make a knot in the wire at the top and the bottom with the buttons in the middle. It is easy to thread the buttons on with wire as there is holes to put the thread through. Attach the buttons with either craft glue or double sided tape.

Jar - Pen Holder

So I decided to do a better jar decoration, this one I decided would be a good idea for a pen holder or pencil holder. This one is a lot better than the last one. It also I reckon could be used as a Christmas decoraton, for holding candy canes or other festive decorations.

Flower Crepe Paper

Lets just say crepe paper is not my friend. Tried to make a  flower, didn't think it would be too hard, especially late at night in bed. Guess I need to be surrounded by my crafts to be in a crafty zone. This picture was my inspiration, can't recall the website but it is not my picture.


Monday 16 July 2012

Toilet Paper Flowers

Hello, One of my favourite art and crafts was using old toilet paper roll. How many times do they just go into the bin and be recycled. Hello, One of my favourite art and crafts was using old toilet paper roll. How many times do they just go into the bin and be recycled. From this website and some others, I got the idea to make my own art. So the key items you need for this art is either toilet rolls or gift wrapping rolls to make smaller flowers. I used gift wrap rolls for this artwork. You also need a glue gun, glue, craft glue, paint, paintbrushes, ice cream lid to put the paint onto, beads, ruler, pen and scissors.
The basic concept came from this website but I added my own twist onto it.

http://www.growingupcreative.com/2009/10/eco-kids-craft.html


This is a very easy design, that uses just a plain canvas. I got the canvas from spotlight it was under ten dollars but if you need a canvas for cheaper you can get some from the reject shop or if you want to go even cheaper just attached the artwork to the wall to cuts some costs. The paint I used was the wall colour of my mums wall to match it correctly, before you buy paint make sure to check your  shed or where you keep your paint cans to check for paint that you could use. This is a cheaper way then buying paint when you don't have to, but if you need a little paint don't go to a craft store as they can charge over $15 dollars for a small tube of paint. While at Kmart or the Reject shop you can buy paint for under $5 that is just as good as well as acrylic so that it can be washed away with water, which is safe for kids.

This artwork was to match my mums room which was a light blue with a gold accents to it. I love the gold beads on the flowers to make pop out more. I only used one gift wrap roll that was 75cm long, I cut it into 1cm lengths. From there I painted them all gold, and then using the craft glue to attach the individual gift wrap cardboard to make a flower from 6. The flowers can be made with as little as four or five as well as a flower with 8 petals. I like the six flower petals as it is easy to make with the smaller cardboard rolls. I also find it easier to individually paint each petal rather than after u finish the flower you paint them. It may take longer but this way the inside is painted completely and if any are not painted properly then you don't have to use it. The easier way to apply the beads are with craft glue, it is also best to attach the flowers to the canvas by using the glue gun as well.

TIP : When placing the flowers if you pick them up and put a small pencil mark where the flowers you want to place them that way when you pick the flower up to apply the glue you can put it back in the correct position.

Also it is a good idea to place the flowers on before you glue to see the design that you want.

Make sure that when you glue together the flower that you move them after you glue so then they don't stick to the paper and you loose the paint or the newspaper doesn't get stuck to the painted petals.

Buy the beads first to match the colour, because a lot of paint can not be as bright against the brown toilet paper or gift wrap rolls. If using a light colour, apply twice to make it brighter or only once to get a more rustic look with the brown coming through the colour.

Marble Picture Frame

Hey, I have been looking at these old marbles that I have had since year 2, I am 19 and that is a long time ago for me. Now this craft does need a glue gun and it would work a lot better with smaller marbles but I had these, if you don't have marbles, I think there are some available in the kids sections of Kmart or Big W and are not that expensive would be under $5.

Step 1: Buy a wooden frame, at Big W there are two for $5 and are the 4x6 in size. White was the one I choose. You could use any frame in your house that needs a little colour.

Step 2 : Turn on your glue gun and assemble your marbles in the arrangement you would like.

Step 3: Attach the marbles to the frame, make sure that the frame is lying down not standing because the marbles will just roll off.

I liked that the fact I used a black and white image that made the marbles stand out more as well as highlighting the image in the frame.

I think that you can use coloured buttons as well but this gives it a more of a 3-D element.

Tip: Make sure that the glue in the glue gun is clear and not yellow which can happen to glue that has aged. To find cheap glue replacements the reject shop sells glue for $3. For a cheap glue gun there is one at Kmart for $8. Make sure if there are children using the glue gun that there is an adult present. 

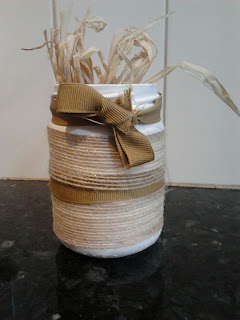
Recycled Jar Decoration

Hello, this is a slightly harder project but it is still things that you can find around the house. Who is tired of having jars around the house that you say that they are going to use to make jam or chocolate sauce or lemon butter. If you are looking for a cheap decoration for a wedding or to put on a mantle or even just cause you like craft. This is made from an old minced garlic jar.
1. The first step is to paint the jar with white paint, (generally found in the shed, left over from painting the house) If not at Kmart there is white paint for $2 in the craft section that will work just as well.
2. Wait for it to DRY!!!, to get better results and not have to repaint I suggest to paint the inside as well and therefore you will not have to paint the jar again.
3. Gather ribbon lengths that can do around the jar over two times.
4. Double sided tape is tricky to use this part but it means that it is quicker and easier to stick the ribbon on.
5. Start by wrapping a thicker ribbon at the bottom and then sticking it down with double sided tape.
6. Then a smaller ribbon over the top of the other ribbon. Repeat step 5, and then with step 6 tie it around with the smaller ribbon at the top of the jar and finish with a bow.
7. Add something in the jar to make it look a little better, that is straw which goes with me country theme for the jar, it isnt perfect but with more time on it, it could be.

Tip: Make sure that the paint is fully dry before trying to attach ribbon. Also make sure that the ribbon you are using are solid or compliments with the white paint.

You don't have to use the white paint, you can choose your own colour but a tip there is to match the ribbons to the colour before you begin.

To get a label off a jar soak in hot water, and peel it off, if still there get a scourer and rub rub rub.

Pinwheel Craft

Hello, Welcome to my Blog.
Over the university break I decided to be a little crazy and do some recycled art, as I am kind of broke.
Basically I tried to use things around the house to put my own creative tweaks onto classic recycled art.
So my first really easy project was making a pinwheel, now I loved the idea of this for a wedding flower, so instead of using a pin to make it swirl, I used a button and attached skewer. This I will make into a flower arrangement later but for now I just wanted to use it for a decoration in the wedding, so far I have made over 25. The instructions from the basis of my pinwheel, I got from this website. http://www.leslietryon.com/3dcolorcutout/makepinw/makepinwheel.html

There is also a version I have made with a cut out star which was an alternative to the button, if you don't want to use a button.

This was uploaded with the use of instagram, and are made with just some paper and a star cut out. My big tip when making pinwheels is to use double sided tape to stick the paper together as well as add on the button or the cut out. It is also not to expensive to buy, for example at the Reject Shop you can buy a massive roll for just $2. It is also not as messy as using craft glue.
If you are using craft glue I suggest the craft glue from Kmart in the craft section of the store which is priced at $2.